Take Your Furniture Product Photography to the Next Level
with Our Expert Tips
The digital furniture market has become increasingly difficult to penetrate and compete in over time and along with that the photo standards have been rising. It is fair to assume that this trend will continue in the future.
In this guide, we will have a look at some key elements that you can improve your product photos to improve your brand look and conversion rates. This guide will also help you make better photography briefs.
Here we cover the following topics.
1. Furniture Photography Lighting
2. Furniture Photography Angles
3. Furniture Products Lifestyle Photos
4. Furniture Photos Retouch Best Practices
5. Furniture Photos Human Element
6. Try 3D Rendering to Save Costs
1. Furniture Photography Lighting
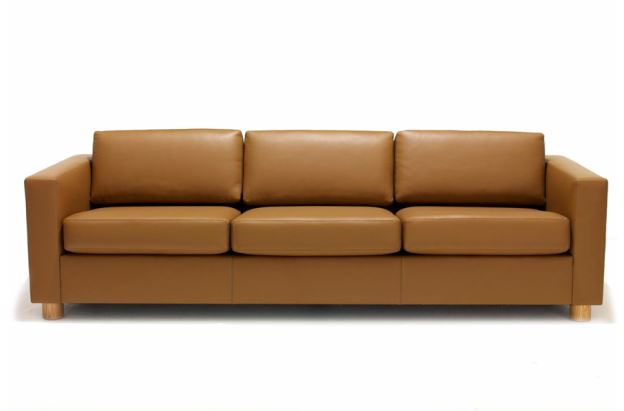
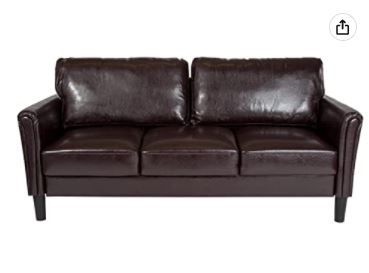
We look at 2 leather sofas product photos in this example.
Sofa Product Photo No.1
We used Knoll's SM2 Sofa for this example
Sofa Product Photo No.2
We used Flash Furniture Bari Upholstered Sofa on Amazon
Sofa No. 1 looks like a beautiful high end piece of furniture, and Sofa No. 2 looks a little messy. Let's try to understand how lighting those first impressions of sofa product photography.
The lighting of Sofa No. 1 is soft, symmetrical, edges are highlighted, and the structure of the sofa is very clear. There are no harsh reflections anywhere, and there is no place on the sofa that is lost in darkness. The legs look beautiful and there is a nice natural shadow at the bottom that grounds the product. The team took their time to set-up all equipment to achieve good lighting for this specific sofa.
The lighting of Sofa No. 2 on the other hand is harsh, there is a big reflection on the upper right side of the sofa that isn't symmetrical to the reflection on the left side. The whole bottom part of the sofa is very dark, and the lighting on the seating cushions and front is exactly the same, so the edges are no clear and the structure isn't clear either. This kind of lighting is done in a rush.
The result is that Sofa No. 2 looks like a much cheaper product that Sofa No. 1, and while it is in fact a cheaper product, this type of sofa photo is unlikely to inspire many buyers to press the buy button even if it is cheaper than their budget, while Sofa No. 1's photo will inspire many buyers to wish they had the budget to buy it.
2. Furniture Photography Angles
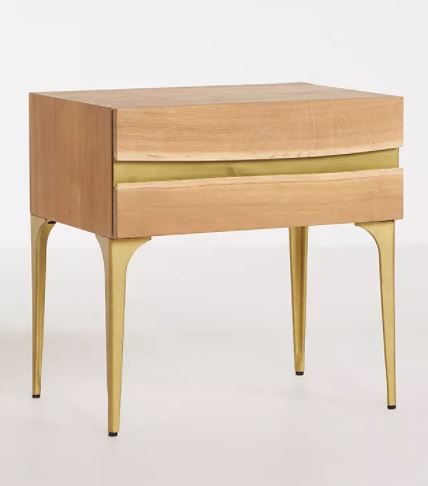
In furniture photography it is very important to keep angles straight and symmetrical. Let's take a look at some nightstand product photos for this example.
Nightstand Product Photo No. 1
(we used Anthropologie's Prana Live-Edge Nightstand)
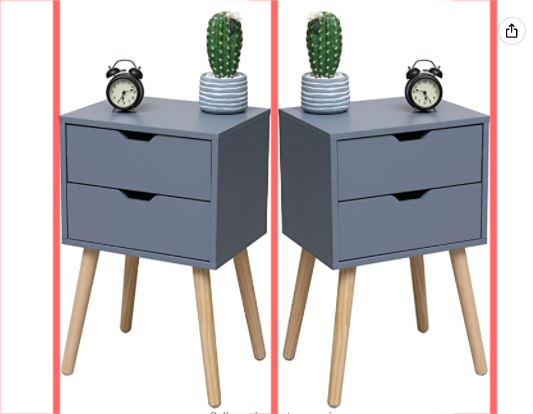
Nightstand Product Photo No. 2
(we used a VIPACE Nightstand with 2 Drawers on Amazon)
The optimal angles for furniture product photos is straight angles, you don't want to give an impression that the product is wobbly in any way. As you can see for Nightstand No. 2 with the help of the red lines I added, the vertical lines of the product aren't straight, and as a result the product looks wobbly and non-symmetrical.
Many buyers would be put-off by this alone. 99% of furniture photographers will not make this error, so it is best to hire a ecommerce photography company with furniture photography experience. Even if for some reason you receive furniture product photos where this issue exists, this is actually VERY easy to fix in post-production, so there is no need to publish photos of your product looking like it will collapse any minute. If you notice this, ask the team you hired to correct it.
In this photo, it is also clear that one single nightstand photo was taken and it was later mirrored in post-production to look like 2 nightstands. There is no problem with this approach, however, definitely change the props for better results.
I meant this point to be about angles, but I noticed this photo has a white balance problem, so I went to look at the store front of this seller and found this:
Quite a few problems here. Incorrect white balance, flat lighting, wobbly angles, and complete lack of consistency even for what looks like identical size products. The first impression is not great, and the products look off color and washed out. Again, I am not commenting on the quality of the products themselves, only of the quality of the photos. These are furniture photography basics, this seller could really benefit from a few simple tweaks to improve their furniture product photos.
3. Furniture Product Photography Lifestyle Photos
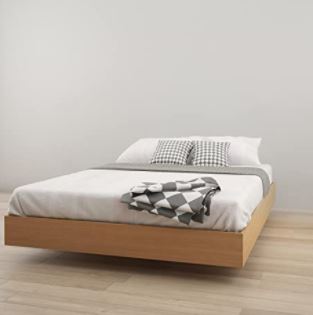
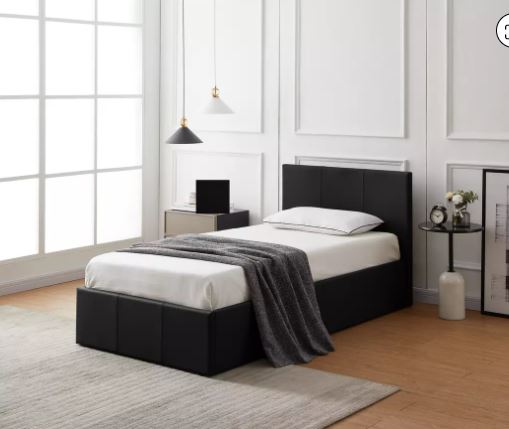
One really great way to improve your furniture product photos is to add lifestyle photos to each listing. Here we have 2 examples of bed lifestyle photos.
Furniture Lifestyle Photo of Bed No. 1
(we used Nexera's Nordik' Bed on Amazon as an example).
Furniture Lifestyle Photo of Bed No. 2
(we used Habitat's Lavendon Ottoman Bed as an example).
Furniture lifestyle No. 1 is a very basic photo with just the bed with bedding, the placing of the props (pillows, throw, bedding) is random and not styled at all., Furniture lifestyle photo No. 2 is a more elaborate affair with bedroom furniture, a window, carpet, and different small props. The styling is neat and elegant. Vertical lines are vertical. As a result Lifestyle No.1 looks like it was taken in a cramped room, while Lifestyle No. 2 gives the impression of a very spacious room, a room to aspire to have.
Which of these lifestyle photos is more likely to inspire a shopper to buy? And more importantly does an average lifestyle photos actually put people off buying a product? My guess would be that furniture lifestyle photo No. 1 has very little positive impact on listing's conversion rates.
How are furniture lifestyle photos taken? There are 2 ways to create furniture photos in rooms; the first way is to take the furniture to a studio set that is made to look like a room, and the second way is to create the lifestyle photos in 3D and render the photos, sometimes only the room is rendered at the right angle and the furniture product is put into that room in post-production. None of these are cheap.
Furniture is notoriously expensive to photograph because it is heavy, transport and assembly at the studio is not cheap, and the space required to set-up lighting is big and ceilings need to be high. There are ready made sets, we work with many such sets that can be used immediately, but they may not be 100% the set you want. It is also possible to create a custom set or a set at the manufacturer's site, if there are many products to photograph, and this costs more than a ready set. In addition to sets, styling also needs to be considered and defined.
The most convenient way to take lifestyle photos of furniture is to take photos on white at the manufacturer's site and then retouch them into room backgrounds. While this approach is complex from a post-production point of view and master retouch artists are needed to achieve good results, it does allow for more variety in backgrounds than real sets. In terms of furniture photography pricing, photos on sets are cheaper than realistically retouched photos of furniture in a room.
4. Furniture Photos Retouch Best Practices
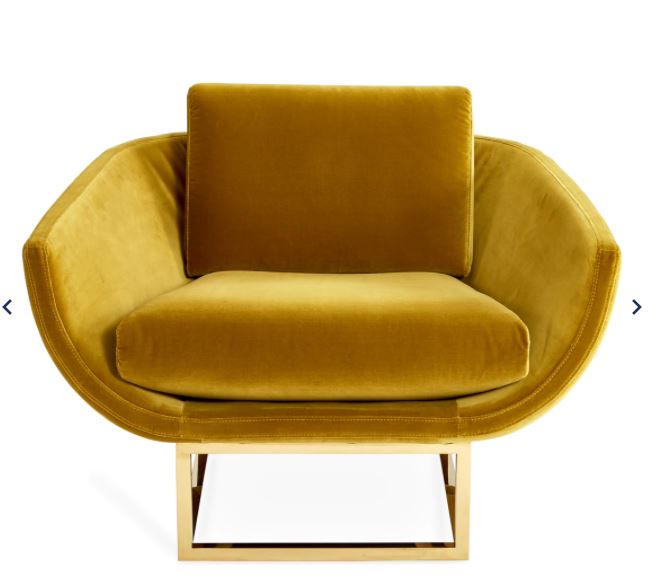
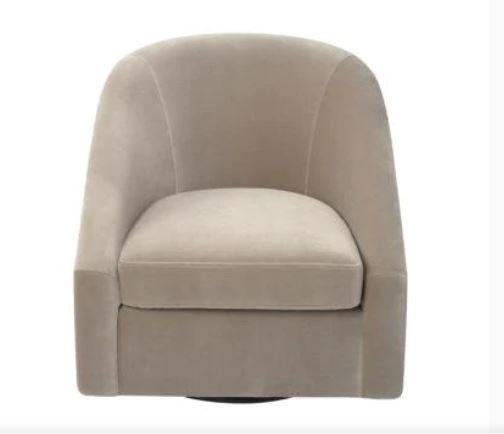
Post-production, or retouch is a major factor in producing high quality furniture photos. There is a balance that has to be achieved in retouch so that any product defects are removed from the photo, but not so much so that the photos start to look fake. For the retouch example, we use 3 different velvet chair photos.
Velvet Chair Retouch No. 1
(we used Jonathan Adler's Beaumont Lounge Chair)
Velvet Chair Retouch No. 2
(we used Retro Velvet Living Room Chair High by Freemax on Amazon)
5. Furniture Product Photos Human Touch
Furniture photos can benefit a lot with the addition of live models to the photos. Live models are definitely not the norm in furniture photography, because as mentioned previously, the production is already expensive, and adding a model only raises the cost even more and is risky because the wrong model choice can result in the whole photo shoot simply not turning out great and the financial loss can be quite substantial.
However, adding a human touch, does not need to be a whole live model, in many cases a hand model is more than enough to do the job. What is the first thing that people do in a furniture store when they see a piece they like? They go and touch it to feel the material. While they can't touch a product online, you can show a photo of someone else touching the product. This type of photo will provide a lot of information about the material, and this is especially true for soft items like sofas.
6. Try 3D Rendering to Save Costs
Furniture is expensive to photography, so even if you do all the suggestions in this article and get the best photos for your budget, your business will still spend a lot on photography. One way to reduce your photography budget is to 3D render products. With our 3D rendering services you just need to provide the specs of your product and photos and in most cases we can do them. Some products are more suitable for 3D rendering than others, for example hard surface products like wardrobes, chairs, tables can be rendered with great success, while soft products like sofas and cushions are more difficult, not only because the shape is more difficult to recreate, but also the texture is very complex to do well, especially for one-off projects.
Have a furniture brand? Check out out Furniture Photography Services

